Showing posts with label dark chocolate. Show all posts

Sunday, 21 June 2015

Three Weddings And A... Birthday (Cake!) {Wedding No. 2}

After that brief interlude by IBS-bleh, we're back to IBS-bake and therefore cake! I've been busy with birthday cakes lately - hopefully photos to come in a post of their own, but first I must report on the promised wedding cakes...

Wedding No.2: C + I = Buttercream Seascape

This wedding cake was for my (very trusting!) friend C and her fiancĂ© who were married at Easter weekend. Their stunning inspiration photo was this one below. Unfortunately I don't have the credit details at hand - it seems to originate on OneWed but they don't list the source... I've asked the site moderators for the credit info and will update if I get a response. 


Creator unknown - found on OneWed
Goes to show how important it can be to watermark your work! I've used PicMonkey to mark the photos that follow, on the recommendation from the wise and wonderful Rose of Rose Bakes. She provides some super-simple instructions that helped me a lot here. Also, she makes gorgeous and clever cakes that you should definitely check out!

I must add that the bride's talented friend M created the stunning sugar sunflowers and foliage, travelled hours with them by car and attached them just before the reception - legendary work!!! Despite neither her nor I knowing what the other was going to do, I think that both cake and decorations looked beautiful together.

This cake had to serve approx. 120 guests so a single-tier like the one above wasn't going to cut it. In fact, it took a 12 inch carrot cake, a 10 inch passionfruit buttermilk cake and an 8 inch rich chocolate mud cake, as well a sheet cake also in the mud cake flavour to provide enough dessert for the guests. Not as delicate as the inspo cake, but with the sunset-over-the-ocean theme of the wedding, I tried to create an ombrĂ© effect of waves with foamy tops. In the first picture below you can compare it to the real waves and decide for yourself how I did!


Super shiny Swiss meringue buttercream!
From another angle, the icing pattern looks more frothy and its colour looks better blended (something that I realised I need more practice at!). 


View from the top
Now I'm just playing with my new camera for lighting fun!
If I'd had more time I would have liked to pipe around the cake boards between layers but it was a bit of a rush once we got into the venue, especially to get the beautiful decorations on, so I hope it didn't detract from the overall effect. Here's the fully decorated cake:


Yes, I played around with the contrast in this pic and I don't regret it at all!!
I love the lighting in this picture - and the detail in those sunflowers!

Here are the cakey details for anyone interested:

  • I used the Chelsea Sugar carrot cake recipe, but as is this is prone to under-cooking in my very average oven, I've since switched to an Annabel Langbein recipe. For the filling, I used my favourite recipe for super-stable cream cheese icing from Rose Bakes with a little lemon rind added.
  • The passionfruit buttermilk cake is a Women's Weekly recipe that I have recently come across - very dense but with a nice fresh flavour from the passionfruit. It was filled with a store-bought passionfruit curd (us working gals have to take shortcuts somewhere!) but unfortunately the layers were prone to sliding as a result, since the curd reduced friction between them. Next time I'd recommend a passionfruit buttercream instead.
  • For the chocolate cakes I used another Chelsea recipe - it still produces a spongy chocolate cake texture rather than a thick brownie-like one. Which is totally fine if you want rich chocolate flavour which still looks like cake! Simple white chocolate ganache filled these chocolate layers.
  • The Swiss meringue buttercream was made the cheat's way that has changed my life (which one day I will add to my SMBC post...) in copious quantities - 4.9 times the recipe at that link to be precise! After crumb-coating the cakes, I coloured the rest of the icing four separate shades of blue, which took more Wilton Sky Blue gel colour than you would imagine given the pastel shade. And I used two shades on each layer, obviously the lighter on the top half and the darker on the bottom. I was washing blue colouring off everything in sight for days!
  • Note: 12 inch cakes are heavy and need to be firmly attached to their base board - this one wasn't and went for a little slide into the side of its carry box in the car on the way. Fortunately buttercream is very forgiving and fixable!!

The bride and groom seemed to have a great time - I was glad to be able to contribute to their happiness in this way on their special day :-)


Saturday, 16 May 2015

Three Weddings And A... Birthday (Cake!) {Wedding No. 1}

It's been a bit quiet on the blog-front for the past month or so - which means that it's been busy in the kitchen! I'm finally able to share with you what I got up to slightly secretively in December and give an update of what I've been baking recently - namely a bunch of lovely but challenging wedding cakes for friends plus my bestie E's special birthday cake. There's been a lot of cake (understatement of the century!), so I'm spreading them over four posts altogether.

As much as I like to share with the virtual world, I'm looking forward to reading (and re-reading!) these finished posts myself to remind myself of what I've learnt during the past six months in baking and caking :-) I've also been taking fledgling steps in food photography, which you'll see in some of the posts, although where the images are not mine (mainly this post) I have given credit to the photographer(s).

Wedding No.1: S + J = Fondant Frills

Seeing as I was enjoying getting into cake decorating for the first time in 2014, I figured I would need a challenge to flex my new skills on by the end the year. S and I had flatted together before I got married, and then I got wind that her own engagement was near (having a unique vantage point because of J's request to hold the fort at the church bookstall while he took her out to a 'surprise' weekend retreat!).  I asked (as soon as it was proper) who would be making their cake, and was met with "we weren't even thinking of having a cake!" 

Well, that was all I needed to see my mission in life as their personal wedding cake-r. In my enthusiasm, I didn't ask how many people they were inviting, which meant a wee bit anxiety, a lot of thinking and a fair bit of consulting other more experienced cakers. The loans of my parents in-law's freezer and a colleague's massive perspex cupcake stand - to store and then display 370 cupcakes - convinced me that this epic first wedding caking could indeed succeed. 


Cupcakes a-plenty (photo by NOPHOTO)

Beautiful photos by Dru and Talia of NOPHOTO show the outcome: a day that drizzled until the last moment (the tent covering threatened with tiny drips to unleash a torrent of captured rain onto the cake table) cleared up for the ceremony then opened up into sunshine for bridal photographs. The bride and groom made a handsome couple in ivory and tweed respectively, flanked by bridal party members wearing the sunset colours of the icing flowers and leaves on the cake.

Photo by NOPHOTO
The cake itself was my first proper attempt at ruffles using gumpaste and I found this tutorial (by the wonderful Rose Atwater of Rose Bakes) to be invaluable. It took a wee while for each frill to dry but was not the most difficult design, seeing as the rustic look benefits from not looking absolutely perfect!


Photo by NOPHOTO
The gumpaste roses and leaves were made using Wilton and Americolor gel pastes and dusted with colour lustre dusts. I was really pleased with the yellow ones in particular - the orange dust I used gave them a nice depth. In case you're wondering...they were attached to toothpicks and stuck into the cake, while the leaves were attached using edible glue.

Photo by NOPHOTO
Cake flavours were Annabel Langein's banana cake recipe with dark choc ganache and preserved ginger (S's fave!), both covered in white choc ganache under a fondant base. 

The cupcakes were vanilla (MY fave recipe) and chocolate (a la Sweetapolita) with regular buttercream as I've posted about before except substituting half of the butter with Kremelta to make it brighter and whiter. Each had a little rolled rose and leaf in the same colours as the cake's ones. And there were certainly a lot of them...


Photo my own
So when I say it was an 'introduction' to wedding caking... it was more like a  baptism by fire!!! But good fun and good learning ;-) Thanks to the bride and groom for the opportunity, and to them and NOPHOTO (check them out!!!) for letting me use these stunning photos.

Photo by NOPHOTO


Friday, 20 March 2015

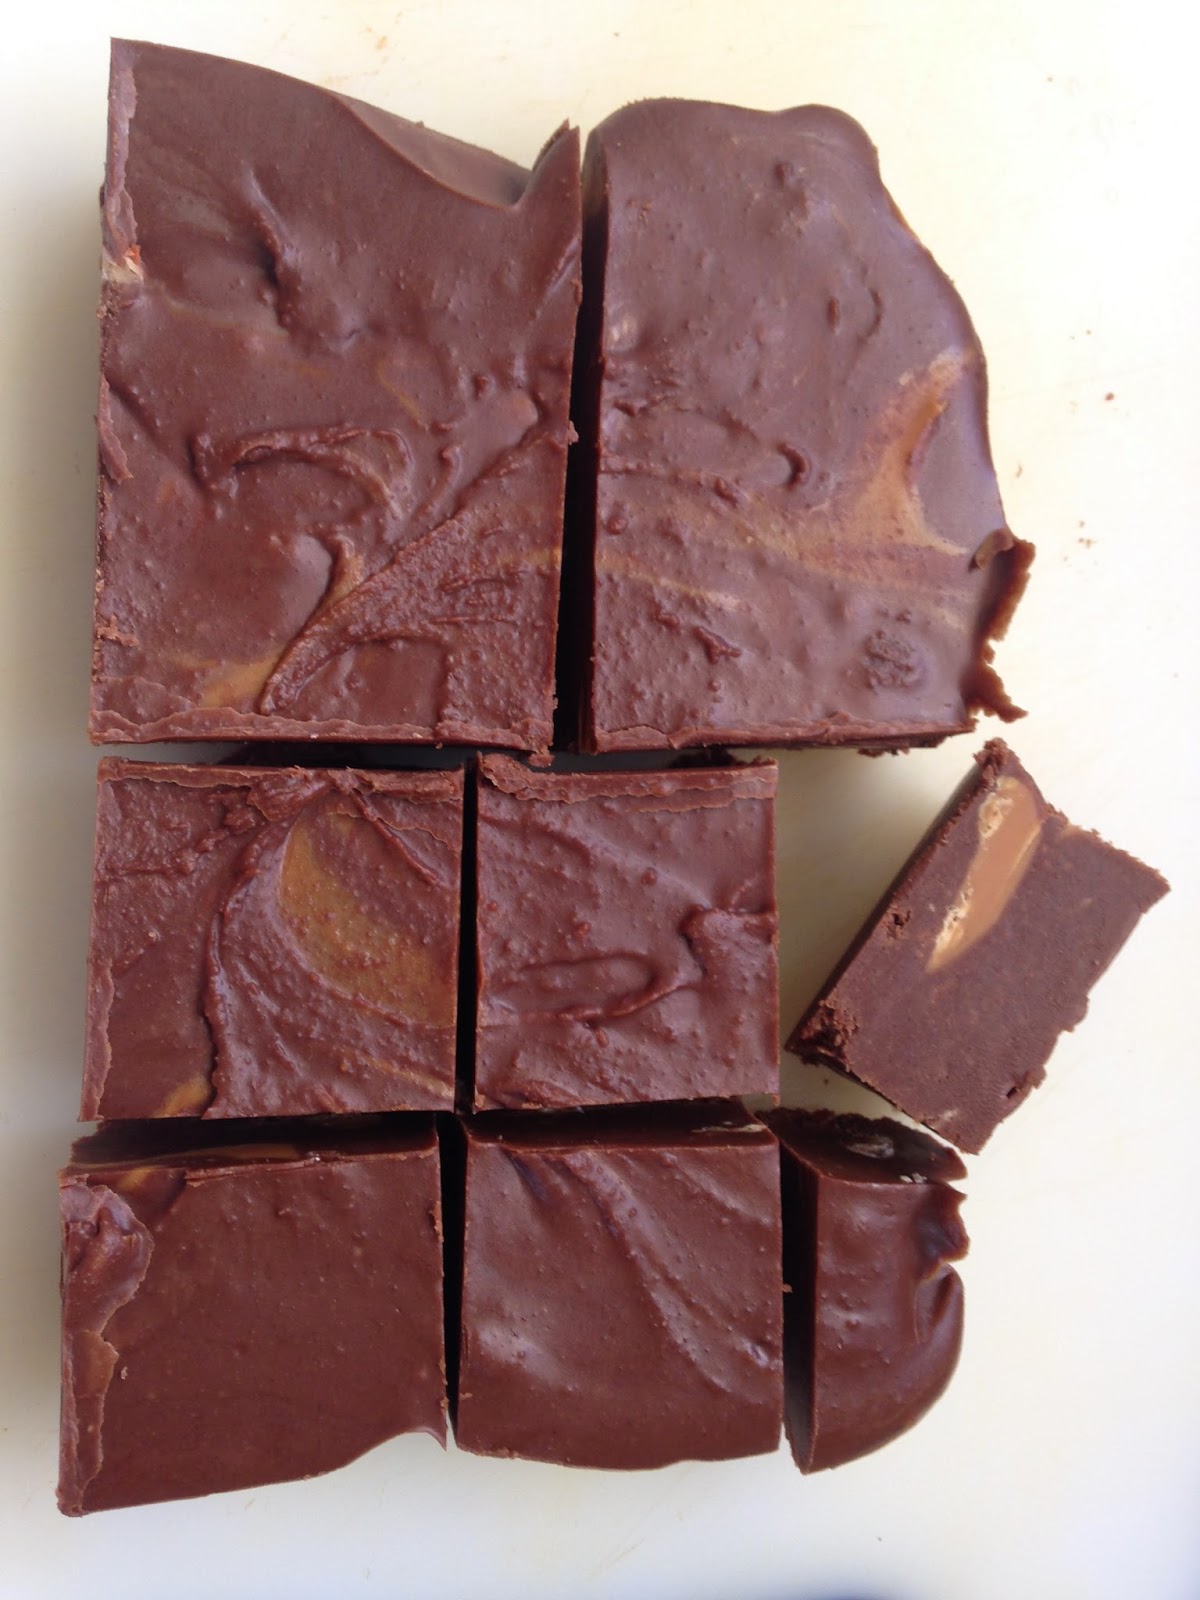
Peanut Butter (Nutter!) Chocolate Fudge

Maybe I should have been born American.

Chocolate and peanut butter - while perfect on their own - are simply heavenly combined. This is not a new revelation (my last post focussed on this same perfect duo). However it presents many opportunities that I am loathe to waste!


 The idea for this (original!) recipe was inspired by the cafĂ© at my workplace. A few weeks ago, I noticed for the first time their decadent chocolate peanut butter fudge. A colleague of mine managed to squeeze the staff for their recipe, which I rated pretty high on the scale of the-perfect-combination-of-sweet-and-peanut. I was surprised to find that, aside from peanut butter, its only ingredients were white and milk chocolate. Those sweet chocolate flavours were dulled down significantly by the smooth p'nutty butter - again I say, the perfect combination!


I'm in that category of people who consider that 'white chocolate' is an oxymoron so I went without the white when trying to replicate this fudge. Plus I wanted to reduce the melty-ness due to high cocoa butter by introducing sugar on its own. Here's my version, in which I used smooth, no-salt and no-sugar peanut butter. Add the sugar slowly - if you want to use sweetened peanut butter you may not need as much so just check the sweetness after each half cup of sugar you add. Crunchy peanut butter is another option, especially if you wish to omit the candy or melts.

Peanut Butter Chocolate Fudge

100g butter
350g Whittakers Dark Cacao chocolate
1 cup peanut butter
3 cups icing sugar, sifted
1 cup of peanut butter melts and candies e.g. Reeses Pieces

Melt the butter and chocolate together in a large saucepan over low heat. Add the peanut butter (still heating) and stir until combined.


I melted the butter on its own to start

350 beautiful, tasty grams...


Remove from heat and add the icing sugar half a cup at a time, tasting each time until preferred sweetness is reached. 

Stir in chopped peanut butter melts and candies if using. Pour mixture into a 9 inch by 13 inch rectangular tin, lined with baking paper. Refrigerate until set then cut into pieces and serve at room temperature.


You can use any peanut butter candies or melts, or even other flavours if you prefer


Before the fudge was set
Delicious 'after' shots!


Monday, 26 January 2015

{A Summer of Decadent Desserts} Cheesecake Chocolate Cake with Salted Caramel

Ah summer and its long sunny days. What could be better than dining late during those warmer nights? Ending them with a delicious sweet treat, that's what! 


This month I've been trying out some gorgeous recipes that have been floating around the blogsphere; recipes where salted caramel, thick chocolate brownie and rich cheesecake layers interlace with flowing ganache or flavoured buttercream. The sort of desserts that fully deserve being described as 'decadent'. 

These recipes tend to involve a number of steps spread over several hours (or days!) but all the effort is... Totally. Worth. It.

So for the next couple of posts I'm going to do some promos of other baker's great ideas by trial and taste test. Hopefully you'll find you're a fan of their work and support the many inspirational (and irrepressible!) bakers who spend so much time developing recipes for anyone to try for free! 

First up: Salted Caramel Chocolate Cheesecake Cake from Shugary Sweets.


You might notice that I've called it something different in the title of my post. I'm a little bit of a grammar cop - the adjectives (eg. chocolate) in English need to come before the nouns (e.g. cake). 

It's not like I care or anything... but this dessert is difficult to grammarise(sp?!), because there are really two cakes: chocolate cake and cheesecake. But the cheesecake is not chocolate flavoured, it's plain/vanilla-ish. 

See the problem? By calling it a chocolate cheesecake cake you could misunderstand and expect the cheesecake to be chocolate flavoured. 

And you would be bitterly disappointed (well, maybe).

Also, by starting the description with 'salted caramel' you could expect the cake to infused with that flavour, rather than topped with it. 

And you would also be disappointed (although not really, because there's still lots of lovely caramel in the icing!). 

I'm not writing this in criticism - I just feel like I need to clarify why I've called it by different name (a rose, anyone?!). 

So that no-one would be disappointed. 

If it makes it better, I've used the original name in my computer file name for the photos I took of it...

Ok, ok, let's just have pictures instead of words.


That's better - well, not the best images (can't wait to get a new camera soon so I don't have to use my phone one!!!) but I hope it makes the grammar-point. And there shall be no disappointment.

Bring me the notes for this recipe! (Before Grammar Cop spoils this post any more...) 

  • The recipe is really easy to follow but takes a bit of planning; I made the chocolate cake first because - unless you split the mixture between two cake tins - it needs to be thoroughly cooled and preferably refrigerated before attempting to cut it through the middle. Which brings me to the next point...
  • Cook the chocolate cake well. I used the Sweetapolita recipe but thought that it needed to be a little bit gooey to go with the cheesecake layer, so I shortened the cooking time. And... I was the one who was disappointed - it was so gooey that I couldn't cut through the middle to split it into layers without making a huge mess. Lesson learned. 
Nothing risked, nothing gained...
  • Well oil the tin and use baking paper on the base for the cheesecake layer. This is a base-less cheesecake (i.e. no biscuit crumb) - but it works really well! I was a little unsure if the cream and sour cream in the mixture would prevent it from solidifying in the oven, but nope, it set great! 
Cheesecake layer on its lonesome
  • Add cooled caramel sauce to the buttercream. This may seem like common-sense... but yeah. By this point in the recipe, you probably wish the whole thing would end so that you can just EAT the cake, hence you might opt for a pre-made caramel sauce. If you're still telling yourself 'no pain, no gain', the recipe includes a link to a sauce-making process that requires a candy thermometer. You may not have one of these or, like me, you might not trust your thermometer as far as you can throw it (perhaps I should get a new one, you say? Perhaps you are right... or perhaps I just want an excuse to throw something around in the kitchen!). In this case, you could use the easy and super-delicious recipe below that I've developed by checking out other recipes and trialling them.
Applying caramel buttercream to the cake-cheesecake-cake stack
  • Use a water bath to melt chocolate for the ganache. Burnt chocolate is lame and next-to-useless (unless you really are trying to make sure your guests don't come back again). Because I am prone to burning chocolate just by looking at it, I've given a safer method below for making ganache by heating the cream only.


Salted Caramel Sauce

1 cup white sugar
1/4 cup water
1/2 cup whipping cream
50g butter, roughly chopped (salted or unsalted, whichever you prefer)

1 tsp salt

Combine the sugar and water in a heavy-based saucepan over a medium heat and stir until sugar is dissolved.

Turn the heat up to medium-high and stir until the sugar water begins to boil. Now, put down your spoon somewhere that you won't be tempted to pick it up from for awhile. But don't go and sit down - you need to keep your eyes firmly trained on that sugar water! You're waiting for it to begin to change from clear into an amber colour. This takes approximately five minutes and during this time you MUST NOT STIR the water - it's the law. If the sugary build up around the edge of the water level starts to drive you crazy, I will permit you to take a pastry brush and gently sweep those bits into the bubbling liquid. But no more than that. 

When the sugar water starts to look golden-coloured, take the pan from the element quick-smart. You may be tempted to wait to see if all the liquid will turn amber, not just one part/half/quarter/smidgeon. Resist temptation - it's not worth the pain of burnt caramel. 

With the pan off the heat, you are now permitted to pick up your spoon. Add the cream slowly, stirring well and keeping your skin as far from the top of the pan as possible in case the liquid spits up. When all the cream is incorporated, add the butter and salt, and stir to melt and combine the butter. The more butter you add, the thicker the caramel will be when it sets.

At this point, some people would put the pan back on the heat and stir the mixture in an attempt to thicken it. I don't think this makes a difference - it will thicken just as well at room temperature. But if you've got time to kill, I won't stop you!

This recipe makes enough to add to the buttercream, garnish the cheesecake cake with, plus extra to spoon over individual slices. Mmmmmm....


Dark Chocolate Ganache

115g dark chocolate chips or finely chopped block chocolate
1/3 cup whipping cream

Place the cream in a heavy-based saucepan over a medium heat and stir until it starts to simmer. Just before the cream starts to bubble, snatch the pan (carefully!) off the heat and add the finely chopped chocolate. Stir the mixture until smooth. 

If any solid bits of chocolate remain, cover the pan with a lid and leave off the heat for 5 minutes, then stir again. If there are STILL solid bits, transfer the mixture to a microwave-safe container and nuke for bursts of 10 seconds, stirring after each until you have a lump-free, perfectly homogeneous chocolatey syrup.

You don't need to accompany this rich dessert with anything, but if the density and decadence are overwhelming, try some unsweetened yoghurt and fresh fruit!


Thursday, 30 October 2014

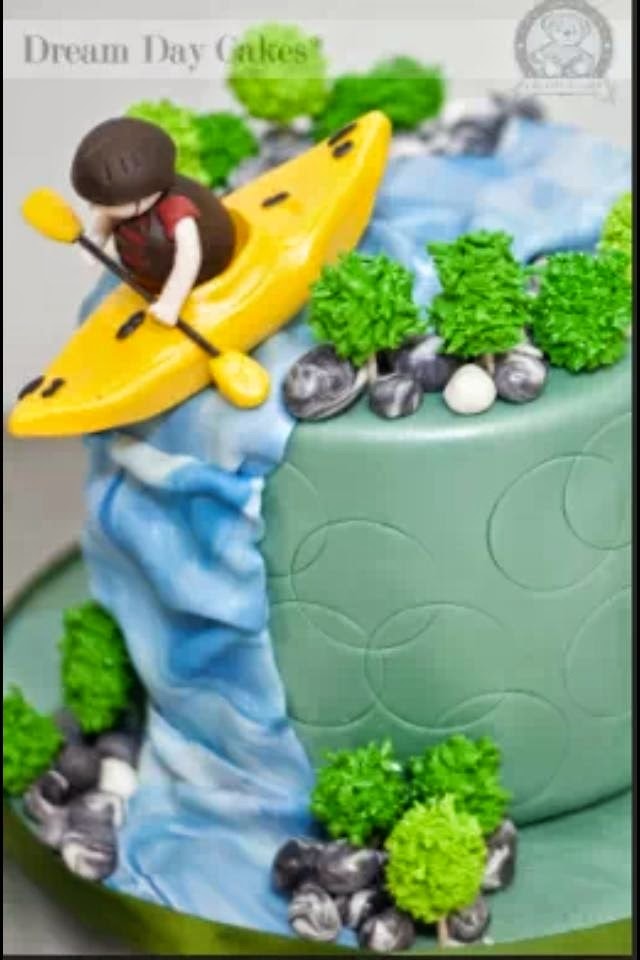
Kayaking Up A Cake-Fall

I've been a bit quiet on the blog front - but plenty of scheming is happening in the background!!! 

This month I've focussed on my first commissioned cake - a 21st birthday cake for the son of a lovely (and very trusting!) friend of mine. According to my friend, a personalised kayaker heading down a fearful waterfall is the epitome of her son's experience as a professional sportsman. And so I learnt how to make the figurine - my first sugarpaste model ever - and the other decorations from this image that I was given to base the design on: 


A challenge indeed! I'll let you decide how I did from the following pictures (photography by our talented friend Dru):


Admittedly, I did a practice figurine first and improved on my technique and colours, especially the arms. Moral of the story: wait until it dries! Drying each part separately before attaching to the torso was really important, as was waiting until the arms were solidly connected to the body before trying to position the oar. This waiting for drying saved many tears the second time round... The pebbles were two colours of sugarpaste rolled together for a marbled effect, and the river/fall was done in a similar way. The little trees went through a garlic press - I tried so many things to get a good effect until I stumbled on that tool!

The cake itself was my go-to chocolate cake recipe, filled with mango marshmallow buttercream made using a double quantity of this recipe plus mango puree, coated in dark chocolate ganache, and covered in chocolate fondant. Whew! It was a huge milestone for me, and not perfect (especially the fondant, as is evident in some of those photos). But it provided lots of learning and good practice for another scheme I have coming up... stay tuned for details! 


Thursday, 14 August 2014

Tiers without Tears: The Story of a Three-Timing Birthday Cake

Although I have less-recent photos for posts on other topics waiting to be written... I can't resist writing about this month's baking adventure - my first two-tiered masterpiece! The birthday trifecta of my lovely MIL, her brother, and one of my Bros in Law was a great reason to try out several caking techniques in fact. Thanks James for the awesome 'finished product' shots! 

[Note to those who might have seen this post published a day early but not been able to find it: sorry! I had forgotten to watermark some of the photos so I reverted it to draft. Thanks for coming back to read it again!]


I think I spent at least a week doing the prep for this cake - and that long literally losing sleep over it... What if the top tier is wonky? What if I can't separate them again after the photoshoot? What if I drop one(!) or both(!!) tiers in transit? (The birthday celebrations were a car trip away from our house, and these photos were taken beforehand). What if the brocade falls off? And the most terrifying of all - what if I just can't cover a cake with fondant to save myself?! 


I wouldn't say that these worries were all for naught - it took me two goes to get the fondant to an acceptable state - but it pays to recognise that the caker is always going to be the most critical of the cake! 


Other than two-tiering and covering a cake with fondant, the other techniques that were new to me were: creating and arranging life-like gum paste roses, using the petal buttercream technique on the bottom tier, and crumb-coating with a white chocolate ganache (top tier). Suffice to say I learnt alot! 

Ingredients/Components

The upper tier was lemon poppy seed cake from this recipe from Lauren's Latest, split between two 6 inch tins. Separating the cake layers was a layer of white chocolate ganache (I followed these instructions using a 3:1 ratio of white choc vs. cream, and found the spreadsheet referred to - The Ganacherator - to be really helpful!) overlaid by about 1/4 cup of lemon curd (I used a recipe similar to this one with egg yolks and cornflour in it, but the 'authentic' way is more like this recipe). Finally, the fondant covering was white icing from Bakels' Pettinice range and the tulip motif was made from gum paste (which is basically white icing with a small amount of dyocell added to cause it to dry hard). Gum paste was also used to make the roses - but I think that would take a whole other post to describe...!

The bottom tier was Dana's Chocolate Cake from Destitute Gourmet (which Sophie Gray of DG has posted her recipe here in cupcake form, but it's the same recipe as the cake); I used one quantity of the recipe per tier for three tiers. In between the tiers is a layer of mango mousse with fresh mango pieces (use a half quantity of the recipe here under 'B) Mango Mousse')- a bit daring for me but I think it paid off! The regular buttercream used for the crumb coat (it looks green but is actually the same colouring as the outer, petal technique, made green because of the natural yellow of the butter in the buttercream) is a half quantity of this Basic Buttercream Icing, although I did omit a cup of icing sugar because it was sweet enough! And the petal effect was done with my favourite of icings - Swiss meringue buttercream (see post soon on how to make this for yourself, or this tried and tested one from Sweetpolita!). In order to get the 'true blue' colour, I replaced half of the butter with vegetable fat (Crisco) which whitened the icing so that it took up the colouring more faithfully.

Method of Assembly

I think words can be made better by photos, so below is 'picture diary' of the caking process if you're interested. 

Adding the wet to dry ingredients for the lemon poppy seed cake
A bit fuzzy, this picture shows how one quantity of the lemon cake recipe makes two decent-sized 6 inch round cakes, with butter papers used to line the tins.
Perfect white choc ganache!
A dollop of white chocolate ganache to secure the cake to its board
White chocolate is the first layer, with lemon curd ready to go top, then the top layer.
The mustard bottle in the background contains a simple sugar syrup that is applied to the layer before toppings are put on, in order to keep the cake moist.
Cake-sandwich!
Applying the ganache undercoat for fondant

The finished ganache layer - I found it difficult to smooth before it dried; any suggestions? 
Starting with the fondant in roughly the same (round) shape as the cake
I applied a watered-down coating of lemon curd to the ganache to make sure the icing stuck!
After rolling out the fondant icing to a thickness of approximately 5mm, use the rolling pin (like the one in the background though preferable tapered so it doesn't dent the icing) to place the icing on top of the cake.
Secure the top of the sides to avoid cracking along the edge, and use a smoother to attach the whole way down the cake.
Once icing is attached trim away the 'skirt' at the base of the cake board. 
Da-da! Not perfect, but a good (second) attempt!
Gum paste pressed into a tulip brocade stamp, left to dry

Edible glue was used to attach the brocade
Blending stewed fresh mangoes to make the mousse
Gelatine to set the mousse
Fresh mango to be cut into pieces and mixed with the mousse.

Fresh mango mousse and fresh mango - yum!
The chilled and set mousse is slathered over the mango pieces


Application of the crumb coat

SMBC ready to be blue-ed
Five shades of blue used for the petalling

The smart way to petal is to complete a vertical column at a time. My way was not the smart way, therefore the columns don't exactly line up!
Finished petals
Dowels marked and ready to be cut to size for supporting the upper tier (note: secateurs were sterilised!).
Placement of dowels for supporting the top tier.
To finish the top of bottom tier, a combination of petal directions helped to hide the 'seam' between cakes - tricky as it needed to be disassembled after these photos, so I couldn't ice right up to the top tier.

And the eaters were pleased :-)