Showing posts with label buttercream. Show all posts

Saturday, 31 October 2015

Three Weddings and A... (Birthday) Cake! {B-Day Cake At Last}

I try to publish something on this blog at least once a month - and my biggest motivator is my lovely MIL who asks me regularly when my next post will be up :-) Even though I've ended up on Oct 31sh with a not very Halloween-y post, I'm glad for the inspiration from my family to keep blogging regardless of the season! 

For my MIL's birthday last year (celebrated along with two other family members' birthdays), I made my first two-tier cake.

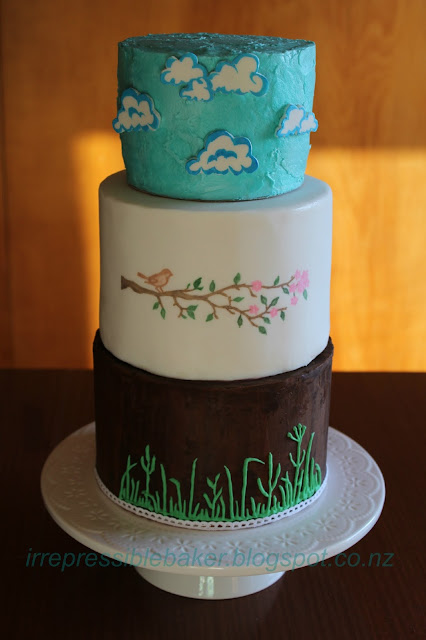
For the trifecta birthdays this year, I made three spring-themed tiers (slightly early, as it was the end of July). Finally, here is the birthday cake that brings this seriously long-spanning four post series of 'Three Weddings and A... (Birthday) Cake! to an end - just in time for the next wedding season...
 
Bursting into spring on a sunshiny day...
I'm pleased to say that the design for this cake was my own, with a lot of inspo from a set of craft stencils that I scored from a newsagents' in Fairlie.


I'll keep the details as to-the-point as my detail-loving brain will allow: the top tier was chocolate (I think, although my notes say carrot...) with Swiss meringue filling and icing, and decorated hand-painted fondant clouds - thanks to my happy helper E!


The middle tier was red velvet, poorly covered in white choc ganache - I say poorly because the red velvet leakage that ensued could have been prevented if I had been more careful and not left any gaps! The escaped moisture also made the outer layer of fondant soft and prone to mishaping (as seen in image below)... My near-despair was topped off by my lack of consideration for the thickness of the fondant in the overall design, meaning this tier was almost the same size as the bottom tier.

Well, I guess if everything was done right the first time then the world wouldn't be such an interesting place ;-) At least the hand-painted little birdy looked happy with his outlook! I traced the stencil design onto baking paper which I then stuck onto the fondant surface and lightly traced over to leave an indentation for painting. Gel paints mixed with cake decorator's fluid did the trick to colour between the lines. 


Lastly the bottom tier was made of delicious preserved ginger cake covered in chocolate ganache with green grass done with royal icing (by eye).
 

Whew! It was a big effort, and the unseasonably hot weather on the day of the birthdays celebration was an unexpected challenge for the buttercream to keep its shape. But sunshine like that and a cake like this, how could we not have been hopeful for an early spring?!
 
 
I'm looking forward to next year's birthday cake challenge - though in future I'll try not to challenge them all to eat so much cake (sorry guys, quality not quantity!) ;-)


Friday, 21 August 2015

Three Weddings and a... Birthday (Cake!) {Wedding No.3}

Nothing like a sick day off work to remind me I have some blogging to catch up on - it would be wrong to just leave things hanging half-way through 'Three Weddings and a Birthday Cake', right?! 

After this wee series I PROMISE to put some actual, rustic, homemade, genuine baking ideas up; even I can't look at cake decorating inspo all day. 

Well, except maybe on sick days... in between binge-watching the latest two seasons of Rookie Blue (I feel totally ok if the series isn't renewed after the Season 6 finale, I'm in a good space right now). 

Ahem, so, cake!

Wedding Cake No.3: Naked Glory

When someone mentions a 'naked cake', what comes to mind? Probably a number of dodgy things, but I want to change those connotations to positive ones... think of something like this instead:


Naked cake by BakerMama

That delightful number was C & K's inspiration cake for their wedding at ANZAC weekend this year. My third wedding cake ever, this one was to be the most 'organic' design - so natural compared to the thick layers of fondant, and less piled-on than the buttercream-slathered look. Naked cakes typically have little shaping done to them, the filling between layers is visible and the barest amount of icing is smoothed around the outside (kind of like a light dusting of snow!). Topped with fruit or flowers, no cake could be fresher!

C & K love Chocolate Guinness cake (and each other of course! <3) so the base of their cake had to be that flavour. Classic carrot cake (I believe I used Annabel Langbein's recipe) won out for the middle tier, and some lovely and light lemon poppyseed for the top tier. Given that I had only ever seen naked cakes made with the same flavour (or at least the same colour) for each tier, I did a practice run of the cake...


For this practice cake I used three different covering methods: naturally oozing filling (bottom tier), scraped filling (top) and 'snow dusted' like the inspo cake for the middle tier. C & K stuck to their guns and decided to go with the latter, and liked my garden flower arrangements enough to entrust me with the task of preparing the decorations as well!

So off I went to make 12 inch, 9 inch and 6 inch cake rounds... 

... And to sing to the flowers in my wee garden, in hope they would be blooming at the time of the wedding (an end-of-April wedding could be a chilly autumn event in New Zealand). 

Fortunately, my singing didn't shrivel the flowers, but I did have some trouble with one of the carrot cake layers under-cooking, hence the middle layer is not as tall as I would have liked. Still, the three tiers you see here were served along with two slab cakes (one each Choc Guinness and carrot), so there was plenty of cake irrespective!


My tree trunk cake stand was made for such a rustic, natural cake as this!


The gorgeous white frilly lily-like flowers along with the lovely soft pink rosebuds came from our neighbours garden, after she had heard of my weekend caking requirements! The blue daisy ones are from my Felicia bush, the small blue ones are from a ground cover with blue star-shaped blooms, the pastel purple ones are geraniums, I threw in some smaller pink camellia blooms, and some jasmine leaves make up the foliage.


Love those white ones!
It was a pleasure to be involved in the wedding of these two young love birds and to learn a new cake design at the same time :-)


Sunday, 21 June 2015

Three Weddings And A... Birthday (Cake!) {Wedding No. 2}

After that brief interlude by IBS-bleh, we're back to IBS-bake and therefore cake! I've been busy with birthday cakes lately - hopefully photos to come in a post of their own, but first I must report on the promised wedding cakes...

Wedding No.2: C + I = Buttercream Seascape

This wedding cake was for my (very trusting!) friend C and her fiancé who were married at Easter weekend. Their stunning inspiration photo was this one below. Unfortunately I don't have the credit details at hand - it seems to originate on OneWed but they don't list the source... I've asked the site moderators for the credit info and will update if I get a response. 


Creator unknown - found on OneWed
Goes to show how important it can be to watermark your work! I've used PicMonkey to mark the photos that follow, on the recommendation from the wise and wonderful Rose of Rose Bakes. She provides some super-simple instructions that helped me a lot here. Also, she makes gorgeous and clever cakes that you should definitely check out!

I must add that the bride's talented friend M created the stunning sugar sunflowers and foliage, travelled hours with them by car and attached them just before the reception - legendary work!!! Despite neither her nor I knowing what the other was going to do, I think that both cake and decorations looked beautiful together.

This cake had to serve approx. 120 guests so a single-tier like the one above wasn't going to cut it. In fact, it took a 12 inch carrot cake, a 10 inch passionfruit buttermilk cake and an 8 inch rich chocolate mud cake, as well a sheet cake also in the mud cake flavour to provide enough dessert for the guests. Not as delicate as the inspo cake, but with the sunset-over-the-ocean theme of the wedding, I tried to create an ombré effect of waves with foamy tops. In the first picture below you can compare it to the real waves and decide for yourself how I did!


Super shiny Swiss meringue buttercream!
From another angle, the icing pattern looks more frothy and its colour looks better blended (something that I realised I need more practice at!). 


View from the top
Now I'm just playing with my new camera for lighting fun!
If I'd had more time I would have liked to pipe around the cake boards between layers but it was a bit of a rush once we got into the venue, especially to get the beautiful decorations on, so I hope it didn't detract from the overall effect. Here's the fully decorated cake:


Yes, I played around with the contrast in this pic and I don't regret it at all!!
I love the lighting in this picture - and the detail in those sunflowers!

Here are the cakey details for anyone interested:

  • I used the Chelsea Sugar carrot cake recipe, but as is this is prone to under-cooking in my very average oven, I've since switched to an Annabel Langbein recipe. For the filling, I used my favourite recipe for super-stable cream cheese icing from Rose Bakes with a little lemon rind added.
  • The passionfruit buttermilk cake is a Women's Weekly recipe that I have recently come across - very dense but with a nice fresh flavour from the passionfruit. It was filled with a store-bought passionfruit curd (us working gals have to take shortcuts somewhere!) but unfortunately the layers were prone to sliding as a result, since the curd reduced friction between them. Next time I'd recommend a passionfruit buttercream instead.
  • For the chocolate cakes I used another Chelsea recipe - it still produces a spongy chocolate cake texture rather than a thick brownie-like one. Which is totally fine if you want rich chocolate flavour which still looks like cake! Simple white chocolate ganache filled these chocolate layers.
  • The Swiss meringue buttercream was made the cheat's way that has changed my life (which one day I will add to my SMBC post...) in copious quantities - 4.9 times the recipe at that link to be precise! After crumb-coating the cakes, I coloured the rest of the icing four separate shades of blue, which took more Wilton Sky Blue gel colour than you would imagine given the pastel shade. And I used two shades on each layer, obviously the lighter on the top half and the darker on the bottom. I was washing blue colouring off everything in sight for days!
  • Note: 12 inch cakes are heavy and need to be firmly attached to their base board - this one wasn't and went for a little slide into the side of its carry box in the car on the way. Fortunately buttercream is very forgiving and fixable!!

The bride and groom seemed to have a great time - I was glad to be able to contribute to their happiness in this way on their special day :-)


Monday, 26 January 2015

{A Summer of Decadent Desserts} Cheesecake Chocolate Cake with Salted Caramel

Ah summer and its long sunny days. What could be better than dining late during those warmer nights? Ending them with a delicious sweet treat, that's what! 


This month I've been trying out some gorgeous recipes that have been floating around the blogsphere; recipes where salted caramel, thick chocolate brownie and rich cheesecake layers interlace with flowing ganache or flavoured buttercream. The sort of desserts that fully deserve being described as 'decadent'. 

These recipes tend to involve a number of steps spread over several hours (or days!) but all the effort is... Totally. Worth. It.

So for the next couple of posts I'm going to do some promos of other baker's great ideas by trial and taste test. Hopefully you'll find you're a fan of their work and support the many inspirational (and irrepressible!) bakers who spend so much time developing recipes for anyone to try for free! 

First up: Salted Caramel Chocolate Cheesecake Cake from Shugary Sweets.


You might notice that I've called it something different in the title of my post. I'm a little bit of a grammar cop - the adjectives (eg. chocolate) in English need to come before the nouns (e.g. cake). 

It's not like I care or anything... but this dessert is difficult to grammarise(sp?!), because there are really two cakes: chocolate cake and cheesecake. But the cheesecake is not chocolate flavoured, it's plain/vanilla-ish. 

See the problem? By calling it a chocolate cheesecake cake you could misunderstand and expect the cheesecake to be chocolate flavoured. 

And you would be bitterly disappointed (well, maybe).

Also, by starting the description with 'salted caramel' you could expect the cake to infused with that flavour, rather than topped with it. 

And you would also be disappointed (although not really, because there's still lots of lovely caramel in the icing!). 

I'm not writing this in criticism - I just feel like I need to clarify why I've called it by different name (a rose, anyone?!). 

So that no-one would be disappointed. 

If it makes it better, I've used the original name in my computer file name for the photos I took of it...

Ok, ok, let's just have pictures instead of words.


That's better - well, not the best images (can't wait to get a new camera soon so I don't have to use my phone one!!!) but I hope it makes the grammar-point. And there shall be no disappointment.

Bring me the notes for this recipe! (Before Grammar Cop spoils this post any more...) 

  • The recipe is really easy to follow but takes a bit of planning; I made the chocolate cake first because - unless you split the mixture between two cake tins - it needs to be thoroughly cooled and preferably refrigerated before attempting to cut it through the middle. Which brings me to the next point...
  • Cook the chocolate cake well. I used the Sweetapolita recipe but thought that it needed to be a little bit gooey to go with the cheesecake layer, so I shortened the cooking time. And... I was the one who was disappointed - it was so gooey that I couldn't cut through the middle to split it into layers without making a huge mess. Lesson learned. 
Nothing risked, nothing gained...
  • Well oil the tin and use baking paper on the base for the cheesecake layer. This is a base-less cheesecake (i.e. no biscuit crumb) - but it works really well! I was a little unsure if the cream and sour cream in the mixture would prevent it from solidifying in the oven, but nope, it set great! 
Cheesecake layer on its lonesome
  • Add cooled caramel sauce to the buttercream. This may seem like common-sense... but yeah. By this point in the recipe, you probably wish the whole thing would end so that you can just EAT the cake, hence you might opt for a pre-made caramel sauce. If you're still telling yourself 'no pain, no gain', the recipe includes a link to a sauce-making process that requires a candy thermometer. You may not have one of these or, like me, you might not trust your thermometer as far as you can throw it (perhaps I should get a new one, you say? Perhaps you are right... or perhaps I just want an excuse to throw something around in the kitchen!). In this case, you could use the easy and super-delicious recipe below that I've developed by checking out other recipes and trialling them.
Applying caramel buttercream to the cake-cheesecake-cake stack
  • Use a water bath to melt chocolate for the ganache. Burnt chocolate is lame and next-to-useless (unless you really are trying to make sure your guests don't come back again). Because I am prone to burning chocolate just by looking at it, I've given a safer method below for making ganache by heating the cream only.


Salted Caramel Sauce

1 cup white sugar
1/4 cup water
1/2 cup whipping cream
50g butter, roughly chopped (salted or unsalted, whichever you prefer)

1 tsp salt

Combine the sugar and water in a heavy-based saucepan over a medium heat and stir until sugar is dissolved.

Turn the heat up to medium-high and stir until the sugar water begins to boil. Now, put down your spoon somewhere that you won't be tempted to pick it up from for awhile. But don't go and sit down - you need to keep your eyes firmly trained on that sugar water! You're waiting for it to begin to change from clear into an amber colour. This takes approximately five minutes and during this time you MUST NOT STIR the water - it's the law. If the sugary build up around the edge of the water level starts to drive you crazy, I will permit you to take a pastry brush and gently sweep those bits into the bubbling liquid. But no more than that. 

When the sugar water starts to look golden-coloured, take the pan from the element quick-smart. You may be tempted to wait to see if all the liquid will turn amber, not just one part/half/quarter/smidgeon. Resist temptation - it's not worth the pain of burnt caramel. 

With the pan off the heat, you are now permitted to pick up your spoon. Add the cream slowly, stirring well and keeping your skin as far from the top of the pan as possible in case the liquid spits up. When all the cream is incorporated, add the butter and salt, and stir to melt and combine the butter. The more butter you add, the thicker the caramel will be when it sets.

At this point, some people would put the pan back on the heat and stir the mixture in an attempt to thicken it. I don't think this makes a difference - it will thicken just as well at room temperature. But if you've got time to kill, I won't stop you!

This recipe makes enough to add to the buttercream, garnish the cheesecake cake with, plus extra to spoon over individual slices. Mmmmmm....


Dark Chocolate Ganache

115g dark chocolate chips or finely chopped block chocolate
1/3 cup whipping cream

Place the cream in a heavy-based saucepan over a medium heat and stir until it starts to simmer. Just before the cream starts to bubble, snatch the pan (carefully!) off the heat and add the finely chopped chocolate. Stir the mixture until smooth. 

If any solid bits of chocolate remain, cover the pan with a lid and leave off the heat for 5 minutes, then stir again. If there are STILL solid bits, transfer the mixture to a microwave-safe container and nuke for bursts of 10 seconds, stirring after each until you have a lump-free, perfectly homogeneous chocolatey syrup.

You don't need to accompany this rich dessert with anything, but if the density and decadence are overwhelming, try some unsweetened yoghurt and fresh fruit!


Thursday, 30 October 2014

Kayaking Up A Cake-Fall

I've been a bit quiet on the blog front - but plenty of scheming is happening in the background!!! 

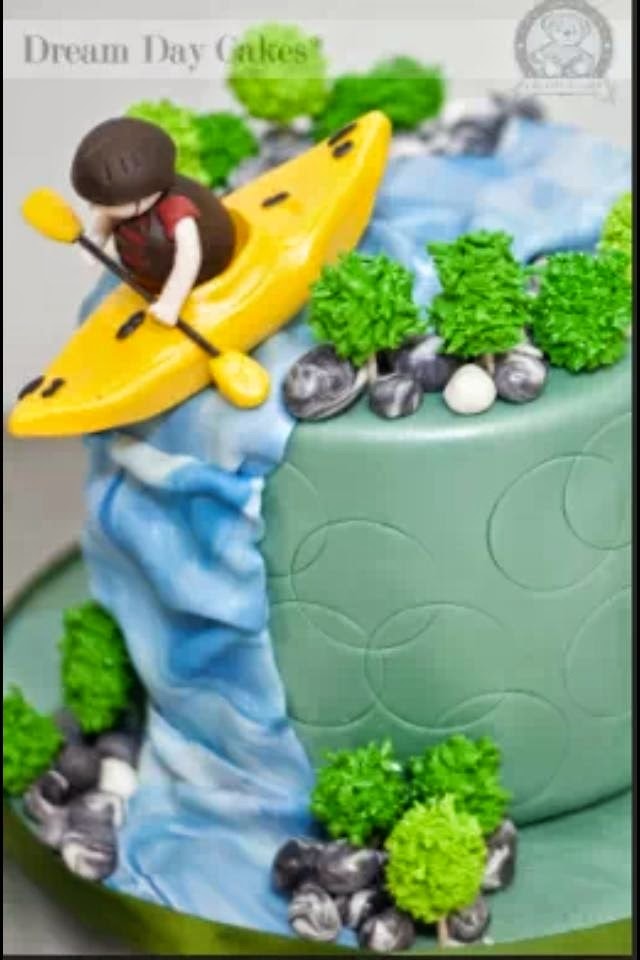
This month I've focussed on my first commissioned cake - a 21st birthday cake for the son of a lovely (and very trusting!) friend of mine. According to my friend, a personalised kayaker heading down a fearful waterfall is the epitome of her son's experience as a professional sportsman. And so I learnt how to make the figurine - my first sugarpaste model ever - and the other decorations from this image that I was given to base the design on: 


A challenge indeed! I'll let you decide how I did from the following pictures (photography by our talented friend Dru):


Admittedly, I did a practice figurine first and improved on my technique and colours, especially the arms. Moral of the story: wait until it dries! Drying each part separately before attaching to the torso was really important, as was waiting until the arms were solidly connected to the body before trying to position the oar. This waiting for drying saved many tears the second time round... The pebbles were two colours of sugarpaste rolled together for a marbled effect, and the river/fall was done in a similar way. The little trees went through a garlic press - I tried so many things to get a good effect until I stumbled on that tool!

The cake itself was my go-to chocolate cake recipe, filled with mango marshmallow buttercream made using a double quantity of this recipe plus mango puree, coated in dark chocolate ganache, and covered in chocolate fondant. Whew! It was a huge milestone for me, and not perfect (especially the fondant, as is evident in some of those photos). But it provided lots of learning and good practice for another scheme I have coming up... stay tuned for details! 


Monday, 8 September 2014

Perfect Piping with Swiss Meringue Buttercream

I've had a score to settle with Swiss Meringue Buttercream icing since promising to post about it several times...since forever!!! SMB, as it's known in the cake world, is also the 'problem child' of frostings/icings and can cause much heartache to the amateur cake decorator, such as I am. But if I can do it, then so can you!

For those new to SMB, it is basically a meringue-based buttercream icing where the egg whites are pasteurised (heated) with sugar before whipping until stiff, then butter is gradually added by further beating. I first used SMB to pipe the rosettes on the cake below...

A bit blurry, but I was so proud!
My first source of SMB knowledge came at the same time as my introduction to the amazing inspiration that is Sweetapolita. Rosie's SMB Demystified post clears up most queries and encourages the most tremulous baker to have a go at making SMB. It is her recipe for SMB that I have adapted in this post and her photo diary along with her instructions are a great resource to look at while you make it for the first few times. I'm simply providing it here in the form that I use for clarity's sake. Martha Stewart's recipe is often recommended to cakers, but I prefer Rosie's because it uses less butter but still works perfectly. 

Personally I think the 'secret to success' for this icing lies in the butter: it needs to be nearly room temperature but not soft. A helpful test is that you should be able to leave imprints in it when pressing the butter with your fingers without it 'walling up' or bending the rest of the block or stick (see the second image in this clever blog post by Sonia of Nasi Lemak Lover to demonstrate the right butter consistency!). The difference between butter that is too soft or just right, is a tense half hour spent hovering over the mixer praying that it 'comes together', or ferrying small amounts to the microwave for short blasts then returning them to the mixing bowl and doing more hovering... More on how to fix the inevitable problems later!

Why bother, then, with such a temperamental icing-child? It is hands-down the most useful buttercream that I've used for piping. It holds up well (although is not ideal for the heat of summer), tastes rich without being overly sweet, and it can provide a bubble-free, silky smooth texture like no other frosting! Although I'm stingy with using egg whites, it's worth following the recipe exactly to get the right consistency of icing.

Swiss Meringue Buttercream

Adapted from Sweetapolita. Makes enough to cover (crumb coat and decorate with rosettes/frills) a two-layer, 9-inch cake. 

8 large, fresh egg whites (approx. 240g worth; be kind and buy free-range!)
2 cups white sugar
550g unsalted butter (that's right...a whole lot of butter!!!), chopped into inch-sized cubes
1 Tablespoon vanilla essence (or other flavouring of choice)

First de-grease the bowl and whisk attachment of a stand mixer using lemon juice or white vinegar. Rinse, and wipe clean with a paper towel (this protects the egg whites from any fat that will prevent them from whipping).

In the mixing bowl (or other heatproof bowl) place the egg whites and sugar. Place the bowl over a pot of simmering water - make sure the bottom of the bowl is not touching the water surface. Whisk the egg and sugar mixture continuously while heating until the sugar has dissolved and the egg whites are hot - this might take ten minutes or longer. You can check by (swiftly) running your finger along the bottom of the bowl and feeling for any grits of sugar that aren't dissolved. Don't get burnt though!

Remove the mixing bowl from the heat and place in the stand mixer (if you have used a bowl other than your stand mixer bowl to heat the egg whites, transfer the mixer to your stand mixer bowl). Using the whisk attachment, whip up the egg and sugar mixture until it is a thick, glossy meringue that forms stiff peaks when the whisk is removed; this takes about ten minutes or so of whipping. IMPORTANT: Is the bowl still hot? It must be cold or at least neutral to touch before adding butter in the next step, otherwise the butter will melt. You can choose to place the bowl with meringue in it in the fridge for ten to fifteen minutes to cool it down. 


Perfectly whipped and ready to get all buttered up!
Change to a paddle attachment on your stand mixer (if you have Kenwood mixer, your K-paddle is perfect). With the mixer on low speed, slooooowly (i.e. at intervals of 30 seconds or longer) add the butter a couple of cubes at a time. The meringue mixture will deflate, like in the image below.


Continue adding butter until the mixture 'comes together' to have a smooth, buttery texture - just like you'd want to spread all over a cake! This takes patience and a lot of mixing - if in doubt, KEEP MIXING... It will look more like butter than 


Et voilà, it might look like a mess, but this batch has come together beautifully!
Lastly add the vanilla or other preferred flavouring and food colouring if desired, beating on low speed until mixed through. This icing freezes and de-frosts really well, just whip it back into shape after thawing.


Trouble-shooting

Is your SMB not looking quite like the pictures? First, just breathe... it's ok! This is a VERY forgiving icing. Let's talk about what's wrong with it and see what we can do...

Help! My SMB is runny like yoghurt! Several possibilities: the egg whites weren't whipped to stiff peaks or they were still warm when the butter was added, or the butter was too soft. Either way, refrigerate the mixing bowl for at least 20 minutes and then beat again for five minutes. Repeat this 20/5 pattern until the mixture starts to offer some resistance to the beating and thickens a bit. Add the rest of your butter when this starts to happen.

Help! My SMB seems to have curdled and taken on the texture of cottage cheese! It's likely that your butter was too cold/solid - or too warm! - when you added it. You could try refrigerating then whipping as per the previous advice, or you could nuke it into submission! Remove approximately one fifth of the icing from the mixing bowl and place in a microwave-safe container. Nuke it for approximately 15 seconds, stir, and gradually add this back into the main mixing bowl while beating. Keep beating for five minutes more and if it doesn't make a difference repeat the process. This has happened to me several times, and often it takes two goes of nuking and straining back in, but it always works! 

Remember: keep breathing and keep mixing!!!

For more excellent advice see Sweetapolita's original posts here and here.

Frilly and Floral Continued

The following is the photo diary of a frilly and floral SMB cake. Previously I've posted how we made the gorgeous fondant decorations, so here I'm showing how we put it all together and piped the SMB frills into place. 

To create the vertical frills, we used a Wilton #104 tip, also known as the petal tip. It is shaped like a tear-drop, and when used it's important to keep the fat end pointing up/away from you, while the narrow end is down/nearest to you. Frills are pretty much an in-out, bottom-to-top motion, coming out approximately a centimetre from the cake which was the extra width of our cake board. Frill direction (along the side of the cake, like in Sweetapolita's post, or into it like ours) is up to the decorator!

For the cake itself I prepared one quantity of the recipe for Sweetapolita's easy and delicious Chocolate Celebration Cake that I re-blogged in this post. It made two decent 9 inch-diameter layers with which my friend D showed superb new skills at assembling and crumb-coating with a regular buttercream (recipe from same post as the cake). 

Filling: tick.
Cling wrap protects the cake turntable and the underside of the cake board from stray icing smears

Starting at the base, zig-zagging in and out, SMB piped into perfect frills

Rosette practice: use a plate so you can have a go then scrape off after each attempt and try again!
Finished rosettes to build up a floral fondant garden
Positioning the décor
Gorgeous flowers and frills!