Thursday, 30 October 2014

Kayaking Up A Cake-Fall

I've been a bit quiet on the blog front - but plenty of scheming is happening in the background!!! 

This month I've focussed on my first commissioned cake - a 21st birthday cake for the son of a lovely (and very trusting!) friend of mine. According to my friend, a personalised kayaker heading down a fearful waterfall is the epitome of her son's experience as a professional sportsman. And so I learnt how to make the figurine - my first sugarpaste model ever - and the other decorations from this image that I was given to base the design on: 


A challenge indeed! I'll let you decide how I did from the following pictures (photography by our talented friend Dru):


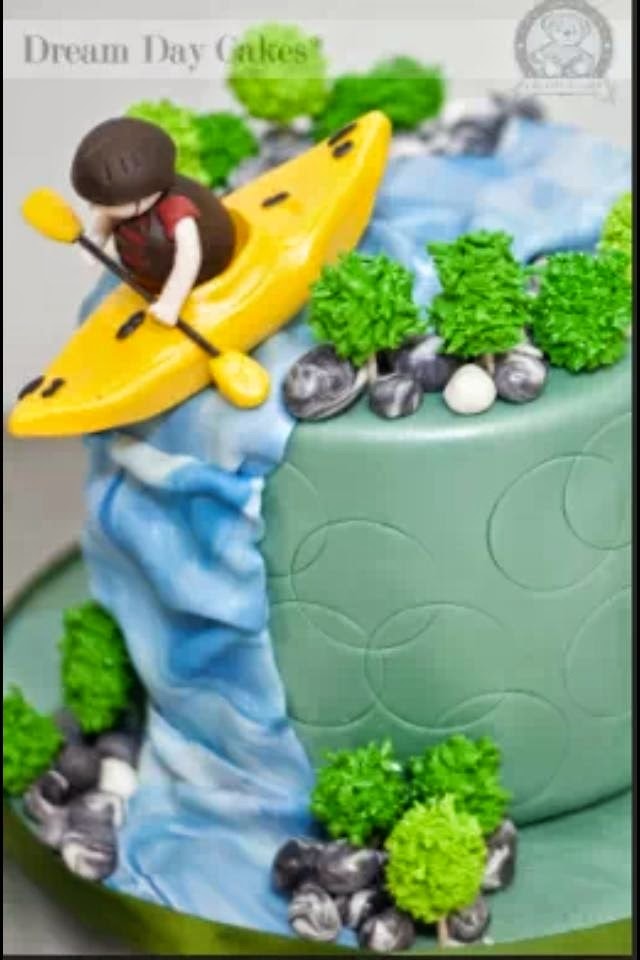
Admittedly, I did a practice figurine first and improved on my technique and colours, especially the arms. Moral of the story: wait until it dries! Drying each part separately before attaching to the torso was really important, as was waiting until the arms were solidly connected to the body before trying to position the oar. This waiting for drying saved many tears the second time round... The pebbles were two colours of sugarpaste rolled together for a marbled effect, and the river/fall was done in a similar way. The little trees went through a garlic press - I tried so many things to get a good effect until I stumbled on that tool!

The cake itself was my go-to chocolate cake recipe, filled with mango marshmallow buttercream made using a double quantity of this recipe plus mango puree, coated in dark chocolate ganache, and covered in chocolate fondant. Whew! It was a huge milestone for me, and not perfect (especially the fondant, as is evident in some of those photos). But it provided lots of learning and good practice for another scheme I have coming up... stay tuned for details! 


Tuesday, 30 September 2014

Warming Up to Spring with Pizza Pinwheels

The last couple of days have been a chilly, windy return to wintery weather (regardless of the sun!) - what I hope will be the last stint of cold and yuck before a long summer. It got me thinking about warmer things - like hot soup, and savoury scrolls (pizza pinwheels, as I prefer to call them). This is a recipe that I've been wanting to share for awhile now, not just because they are so popular at shared morning teas! And it's super simple because you get to use whichever scone dough recipe you know and love. 

This morning my grandfather passed away due to illness - we had been expecting him to succumb for a month or two. I think he would have loved these pinwheels. A stand-out memory of him at the lunch table involved him including a cheese and jam sandwich with every midday meal! Minus the jam for this recipe but I don't think he'd mind, as long as there was plenty of cheese ;-)

Pizza Pinwheels

Ingredients for quantity of scone dough from your favourite recipe (mine is Edmonds!)
4 tsp dried herbs of your choice (I love oregano!)
1 cup grated cheese
4 Tbsp tomato paste


A well-worn page in my Edmonds cookbook 
Sift together the dry ingredients for your scone dough, including the dried herbs.


Rub in the butter to the dry mixture as per your scone dough instructions.


 Once the texture of the mixture is like breadcrumbs, add 2/3 of a cup of the grated cheese.


Slowly add the milk (1 to 1 & 1/2 cups if you're also using the Edmonds recipe) and 'cut' into the mixture with a knife. The best consistency is when the mixture separates into what look like many doughy ribbons, like the second image below. Then use your hands to knead it into one large lump of dough.


Perfectly 'cut' dough
 Separate the dough into two equal-sized parts...


For each half of the dough, shape it into a rectangle with your hands, then roll it out onto a floured board or bench-top. Try to make it about half a centimetre thick, a hand-span wide, and a rolling pin's length-long!


Spread the tomato paste on two-thirds of the width of the dough. 


Use a small amount of milk to moisten the edge that is not covered in tomato paste. Roll up from the tomatoey edge to the moistened edge (you might find it easier to roll by cutting the dough rectangle in half first).


Action shot!
Once rolled up, secure the moistened edge by pressing it onto the roll. Use a sharp serrated knife to cut the pinwheels approx. 1.5cm thick. 


Arrange the pinwheels on a lightly floured or papered baking tray with at least 2cm spacing.


Use a pastry brush to paint the tops of the pinwheels with milk and add a sprinkle of the remaining cheese to each one.


Bake for 10 to 12 minutes in a hot oven (check your scone recipe - probably around 200 degrees C). Cool on a baking rack once done.


Monday, 8 September 2014

Perfect Piping with Swiss Meringue Buttercream

I've had a score to settle with Swiss Meringue Buttercream icing since promising to post about it several times...since forever!!! SMB, as it's known in the cake world, is also the 'problem child' of frostings/icings and can cause much heartache to the amateur cake decorator, such as I am. But if I can do it, then so can you!

For those new to SMB, it is basically a meringue-based buttercream icing where the egg whites are pasteurised (heated) with sugar before whipping until stiff, then butter is gradually added by further beating. I first used SMB to pipe the rosettes on the cake below...

A bit blurry, but I was so proud!
My first source of SMB knowledge came at the same time as my introduction to the amazing inspiration that is Sweetapolita. Rosie's SMB Demystified post clears up most queries and encourages the most tremulous baker to have a go at making SMB. It is her recipe for SMB that I have adapted in this post and her photo diary along with her instructions are a great resource to look at while you make it for the first few times. I'm simply providing it here in the form that I use for clarity's sake. Martha Stewart's recipe is often recommended to cakers, but I prefer Rosie's because it uses less butter but still works perfectly. 

Personally I think the 'secret to success' for this icing lies in the butter: it needs to be nearly room temperature but not soft. A helpful test is that you should be able to leave imprints in it when pressing the butter with your fingers without it 'walling up' or bending the rest of the block or stick (see the second image in this clever blog post by Sonia of Nasi Lemak Lover to demonstrate the right butter consistency!). The difference between butter that is too soft or just right, is a tense half hour spent hovering over the mixer praying that it 'comes together', or ferrying small amounts to the microwave for short blasts then returning them to the mixing bowl and doing more hovering... More on how to fix the inevitable problems later!

Why bother, then, with such a temperamental icing-child? It is hands-down the most useful buttercream that I've used for piping. It holds up well (although is not ideal for the heat of summer), tastes rich without being overly sweet, and it can provide a bubble-free, silky smooth texture like no other frosting! Although I'm stingy with using egg whites, it's worth following the recipe exactly to get the right consistency of icing.

Swiss Meringue Buttercream

Adapted from Sweetapolita. Makes enough to cover (crumb coat and decorate with rosettes/frills) a two-layer, 9-inch cake. 

8 large, fresh egg whites (approx. 240g worth; be kind and buy free-range!)
2 cups white sugar
550g unsalted butter (that's right...a whole lot of butter!!!), chopped into inch-sized cubes
1 Tablespoon vanilla essence (or other flavouring of choice)

First de-grease the bowl and whisk attachment of a stand mixer using lemon juice or white vinegar. Rinse, and wipe clean with a paper towel (this protects the egg whites from any fat that will prevent them from whipping).

In the mixing bowl (or other heatproof bowl) place the egg whites and sugar. Place the bowl over a pot of simmering water - make sure the bottom of the bowl is not touching the water surface. Whisk the egg and sugar mixture continuously while heating until the sugar has dissolved and the egg whites are hot - this might take ten minutes or longer. You can check by (swiftly) running your finger along the bottom of the bowl and feeling for any grits of sugar that aren't dissolved. Don't get burnt though!

Remove the mixing bowl from the heat and place in the stand mixer (if you have used a bowl other than your stand mixer bowl to heat the egg whites, transfer the mixer to your stand mixer bowl). Using the whisk attachment, whip up the egg and sugar mixture until it is a thick, glossy meringue that forms stiff peaks when the whisk is removed; this takes about ten minutes or so of whipping. IMPORTANT: Is the bowl still hot? It must be cold or at least neutral to touch before adding butter in the next step, otherwise the butter will melt. You can choose to place the bowl with meringue in it in the fridge for ten to fifteen minutes to cool it down. 


Perfectly whipped and ready to get all buttered up!
Change to a paddle attachment on your stand mixer (if you have Kenwood mixer, your K-paddle is perfect). With the mixer on low speed, slooooowly (i.e. at intervals of 30 seconds or longer) add the butter a couple of cubes at a time. The meringue mixture will deflate, like in the image below.


Continue adding butter until the mixture 'comes together' to have a smooth, buttery texture - just like you'd want to spread all over a cake! This takes patience and a lot of mixing - if in doubt, KEEP MIXING... It will look more like butter than 


Et voilà, it might look like a mess, but this batch has come together beautifully!
Lastly add the vanilla or other preferred flavouring and food colouring if desired, beating on low speed until mixed through. This icing freezes and de-frosts really well, just whip it back into shape after thawing.


Trouble-shooting

Is your SMB not looking quite like the pictures? First, just breathe... it's ok! This is a VERY forgiving icing. Let's talk about what's wrong with it and see what we can do...

Help! My SMB is runny like yoghurt! Several possibilities: the egg whites weren't whipped to stiff peaks or they were still warm when the butter was added, or the butter was too soft. Either way, refrigerate the mixing bowl for at least 20 minutes and then beat again for five minutes. Repeat this 20/5 pattern until the mixture starts to offer some resistance to the beating and thickens a bit. Add the rest of your butter when this starts to happen.

Help! My SMB seems to have curdled and taken on the texture of cottage cheese! It's likely that your butter was too cold/solid - or too warm! - when you added it. You could try refrigerating then whipping as per the previous advice, or you could nuke it into submission! Remove approximately one fifth of the icing from the mixing bowl and place in a microwave-safe container. Nuke it for approximately 15 seconds, stir, and gradually add this back into the main mixing bowl while beating. Keep beating for five minutes more and if it doesn't make a difference repeat the process. This has happened to me several times, and often it takes two goes of nuking and straining back in, but it always works! 

Remember: keep breathing and keep mixing!!!

For more excellent advice see Sweetapolita's original posts here and here.

Frilly and Floral Continued

The following is the photo diary of a frilly and floral SMB cake. Previously I've posted how we made the gorgeous fondant decorations, so here I'm showing how we put it all together and piped the SMB frills into place. 

To create the vertical frills, we used a Wilton #104 tip, also known as the petal tip. It is shaped like a tear-drop, and when used it's important to keep the fat end pointing up/away from you, while the narrow end is down/nearest to you. Frills are pretty much an in-out, bottom-to-top motion, coming out approximately a centimetre from the cake which was the extra width of our cake board. Frill direction (along the side of the cake, like in Sweetapolita's post, or into it like ours) is up to the decorator!

For the cake itself I prepared one quantity of the recipe for Sweetapolita's easy and delicious Chocolate Celebration Cake that I re-blogged in this post. It made two decent 9 inch-diameter layers with which my friend D showed superb new skills at assembling and crumb-coating with a regular buttercream (recipe from same post as the cake). 

Filling: tick.
Cling wrap protects the cake turntable and the underside of the cake board from stray icing smears

Starting at the base, zig-zagging in and out, SMB piped into perfect frills

Rosette practice: use a plate so you can have a go then scrape off after each attempt and try again!
Finished rosettes to build up a floral fondant garden
Positioning the décor
Gorgeous flowers and frills!


Thursday, 14 August 2014

Tiers without Tears: The Story of a Three-Timing Birthday Cake

Although I have less-recent photos for posts on other topics waiting to be written... I can't resist writing about this month's baking adventure - my first two-tiered masterpiece! The birthday trifecta of my lovely MIL, her brother, and one of my Bros in Law was a great reason to try out several caking techniques in fact. Thanks James for the awesome 'finished product' shots! 

[Note to those who might have seen this post published a day early but not been able to find it: sorry! I had forgotten to watermark some of the photos so I reverted it to draft. Thanks for coming back to read it again!]


I think I spent at least a week doing the prep for this cake - and that long literally losing sleep over it... What if the top tier is wonky? What if I can't separate them again after the photoshoot? What if I drop one(!) or both(!!) tiers in transit? (The birthday celebrations were a car trip away from our house, and these photos were taken beforehand). What if the brocade falls off? And the most terrifying of all - what if I just can't cover a cake with fondant to save myself?! 


I wouldn't say that these worries were all for naught - it took me two goes to get the fondant to an acceptable state - but it pays to recognise that the caker is always going to be the most critical of the cake! 


Other than two-tiering and covering a cake with fondant, the other techniques that were new to me were: creating and arranging life-like gum paste roses, using the petal buttercream technique on the bottom tier, and crumb-coating with a white chocolate ganache (top tier). Suffice to say I learnt alot! 

Ingredients/Components

The upper tier was lemon poppy seed cake from this recipe from Lauren's Latest, split between two 6 inch tins. Separating the cake layers was a layer of white chocolate ganache (I followed these instructions using a 3:1 ratio of white choc vs. cream, and found the spreadsheet referred to - The Ganacherator - to be really helpful!) overlaid by about 1/4 cup of lemon curd (I used a recipe similar to this one with egg yolks and cornflour in it, but the 'authentic' way is more like this recipe). Finally, the fondant covering was white icing from Bakels' Pettinice range and the tulip motif was made from gum paste (which is basically white icing with a small amount of dyocell added to cause it to dry hard). Gum paste was also used to make the roses - but I think that would take a whole other post to describe...!

The bottom tier was Dana's Chocolate Cake from Destitute Gourmet (which Sophie Gray of DG has posted her recipe here in cupcake form, but it's the same recipe as the cake); I used one quantity of the recipe per tier for three tiers. In between the tiers is a layer of mango mousse with fresh mango pieces (use a half quantity of the recipe here under 'B) Mango Mousse')- a bit daring for me but I think it paid off! The regular buttercream used for the crumb coat (it looks green but is actually the same colouring as the outer, petal technique, made green because of the natural yellow of the butter in the buttercream) is a half quantity of this Basic Buttercream Icing, although I did omit a cup of icing sugar because it was sweet enough! And the petal effect was done with my favourite of icings - Swiss meringue buttercream (see post soon on how to make this for yourself, or this tried and tested one from Sweetpolita!). In order to get the 'true blue' colour, I replaced half of the butter with vegetable fat (Crisco) which whitened the icing so that it took up the colouring more faithfully.

Method of Assembly

I think words can be made better by photos, so below is 'picture diary' of the caking process if you're interested. 

Adding the wet to dry ingredients for the lemon poppy seed cake
A bit fuzzy, this picture shows how one quantity of the lemon cake recipe makes two decent-sized 6 inch round cakes, with butter papers used to line the tins.
Perfect white choc ganache!
A dollop of white chocolate ganache to secure the cake to its board
White chocolate is the first layer, with lemon curd ready to go top, then the top layer.
The mustard bottle in the background contains a simple sugar syrup that is applied to the layer before toppings are put on, in order to keep the cake moist.
Cake-sandwich!
Applying the ganache undercoat for fondant

The finished ganache layer - I found it difficult to smooth before it dried; any suggestions? 
Starting with the fondant in roughly the same (round) shape as the cake
I applied a watered-down coating of lemon curd to the ganache to make sure the icing stuck!
After rolling out the fondant icing to a thickness of approximately 5mm, use the rolling pin (like the one in the background though preferable tapered so it doesn't dent the icing) to place the icing on top of the cake.
Secure the top of the sides to avoid cracking along the edge, and use a smoother to attach the whole way down the cake.
Once icing is attached trim away the 'skirt' at the base of the cake board. 
Da-da! Not perfect, but a good (second) attempt!
Gum paste pressed into a tulip brocade stamp, left to dry

Edible glue was used to attach the brocade
Blending stewed fresh mangoes to make the mousse
Gelatine to set the mousse
Fresh mango to be cut into pieces and mixed with the mousse.

Fresh mango mousse and fresh mango - yum!
The chilled and set mousse is slathered over the mango pieces


Application of the crumb coat

SMBC ready to be blue-ed
Five shades of blue used for the petalling

The smart way to petal is to complete a vertical column at a time. My way was not the smart way, therefore the columns don't exactly line up!
Finished petals
Dowels marked and ready to be cut to size for supporting the upper tier (note: secateurs were sterilised!).
Placement of dowels for supporting the top tier.
To finish the top of bottom tier, a combination of petal directions helped to hide the 'seam' between cakes - tricky as it needed to be disassembled after these photos, so I couldn't ice right up to the top tier.

And the eaters were pleased :-)